
What is Astro ?
Astro, or Astro.js is a JavaScript web frame-work for building content-driven websites like blogs, marketing, and e-commerce. Astro focuses on making websites that load quickly and perform well, which is especially important for content-heavy sites. It does this by using the tried-and-tested server-side rendering approach, making it easier to build high-performing websites without the added complexity of client-side rendering. The good thing is that you don’t need to learn a new language to use it because everything is still written in HTML, CSS, and JavaScript (or TypeScript if you prefer).
So what makes Astro different from React or Nextjs or other JavaScript frameworks ?
- Zero JavaScript shipped to the client: By default Astro ships no JavaScript by default to your users devices. What happens is Astro will execute any JavaScript code on the server at build time or request time, and not in the browser.
function convertCraftName(name: String) {
  return "craft/" + name.toLocaleLowerCase().replace(/\s/g, "-");
}<div
class="flex w-full h-14 items-center p-2 mt-1 bg-[#232323] rounded-md justify-center"
>
<p class="group-hover:text-red-500 text-center text-base mx-4">
{convertCraftName(title)}
</p>
</div>For example the function convertCraftName will be executed on the server and the result inserted in the HTML and result sent to the client.
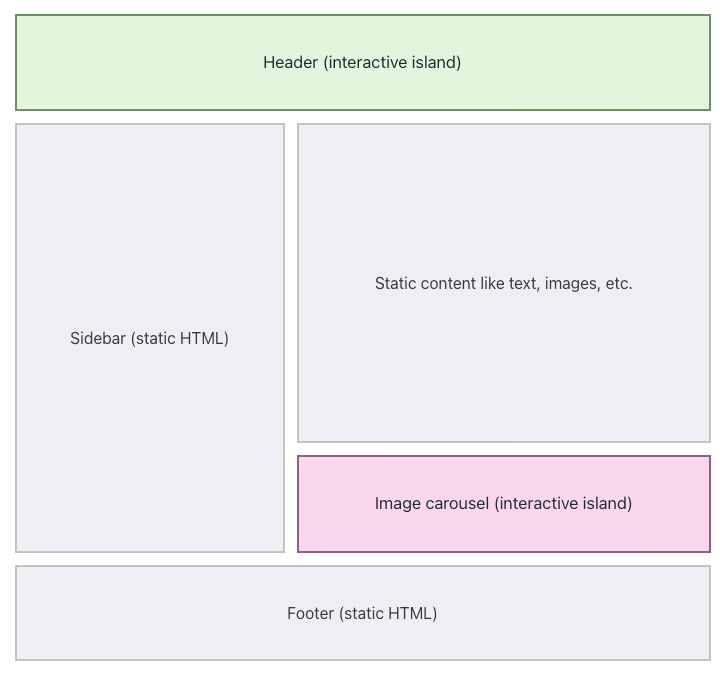
- Island architecture: Astro renders your web app as static HTML by default, without shipping any JavaScript. This makes your site incredibly fast out of the box. But what if you want to add some interactivity — like an image carousel or a dynamic form?
That’s where Astro’s concept of partial hydration comes in.
 Source: Islands Architecture: Jason Miller
In most JavaScript frameworks, the entire app is hydrated on the client, meaning the full JavaScript bundle is sent to the browser. This gives you a lot of power, but it can hurt performance due to the amount of JS being loaded.
With partial hydration, Astro only hydrates the interactive parts of your page — the “islands” — and leaves the rest as static HTML. This means you get the interactivity you want without sacrificing performance.
(I’ll probably write more about this topic another time.)
- Framework-agnostic/UI-agnostic: Since island always runs in isolation from other islands on the page, and multiple islands can exist on a page. This flexibility allows Astro to support multiple UI frameworks like React, Preact, Svelte, Vue, and SolidJS. Because they are independent, you can even mix several frameworks on each page.
How I came to learn Astro
The easy answer is: I just followed the documentation.
The longer answer is: I started by going through Astro’s docs and setting up my project from there. I learn best by doing, so as I built things out, I got a good feel for how an Astro project is structured — so I’ll just talk about that instead.
Astro files structure
.
├── public/
├── src/
│   ├── components/
│   ├── layouts/
│   ├── pages/
│   ├── content/
│   │   ├── articles/
│   │   └── projects/
│   └── styles/
├── astro.config.mjs
├── package.json
└── tsconfig.json
Astro’s file structure is pretty similar to other JavaScript frameworks.Astro’s file structure is pretty similar to other JavaScript frameworks — especially if you’re coming from something like Next.js or Vite. You’ll find the usual suspects: a src/ directory for your components, pages, and styles, and a public/ folder for static assets.
Where Astro differs is in its opinionated but flexible layout:
src/pages/works like Next.js — each file maps to a route.src/layouts/is where you can define reusable page structures.src/components/holds all your UI bits — plain .astro components or framework-specific ones like React or Svelte.package.jsonfor all your npm packages
The nice thing is that Astro doesn’t force you into a strict structure beyond this — it stays out of your way, but encourages good organization.
Layouts
Astro provides a simple way to build layouts that let you share common elements and styles across your pages — like headers, footers, or metadata. It works similarly to layouts in Next.js, but instead of using props.children, Astro uses a special <slot /> element to render the child content.
---
// src/layouts/Layout.astro
const { title } = Astro.props;
---
<html>
  <head>
    <title>{title}</title>
  </head>
  <body>
    <header>My Site Header</header>
    <main>
      <slot />
    </main>
    <footer>My Site Footer</footer>
  </body>
</html>
---
import Layout from '../layouts/Layout.astro';
---
<Layout title="Home">
  <h1>Welcome to my site</h1>
</Layout>
Code fences
A typical Astro component uses something called a code fence — the part at the top of the file surrounded by ---. This is where you write JavaScript (or TypeScript) to define data, props, or logic needed for the page.
Here’s an example:
---
const pageTitle = "About Me";
const identity = {
  firstName: "Madiba",
  country: "Kenya",
  occupation: "Software engineer",
  hobbies: ["gaming", "cycling", "basketball"],
};
const skills = ["HTML", "CSS", "JavaScript", "React", "Astro", "Writing Docs"];
---
<p>Here are a few facts about me:</p>
<ul>
  <li>My name is {identity.firstName}.</li>
  <li>I live in {identity.country} and I work as a {identity.occupation}.</li>
  {identity.hobbies.length >= 2 &&
    <li>Two of my hobbies are: {identity.hobbies[0]} and {identity.hobbies[1]}</li>
  }
</ul>
<p>My skills are:</p>
<ul>
  {skills.map((skill) => <li>{skill}</li>)}
</ul>
The code inside the --- block runs on the server when the page is built, not in the browser. That means you can fetch data, process it, or define variables — and the final output is static HTML.
However, if you need to add client-side JavaScript, it’s pretty easy — just use the regular <script> </script> tag and write your JavaScript inside it like you normally would.
....
<p>My skills are:</p>
<ul id="skills-list">
  {skills.map((skill) => <li class="skill">{skill}</li>)}
</ul>

<script>
  document.addEventListener("DOMContentLoaded", () => {
    const skills = document.querySelectorAll(".skill");

    skills.forEach((item) => {
      item.addEventListener("click", () => {
        item.classList.toggle("highlight");
      });
    });
  });
</script>
Styling
I primarily used tailwindcss for styling, but astro does also supports CSS. Using Astro’s own<style></style> tags, you can style items on your page. Adding attributes and directives to these tags gives you even more ways to style.
<p class="highlight">Highlighted text</p>
<style>
  .highlight {
    color: red;
    font-weight: bold;
  }
</style>
Components
The idea behind components is to break your code into smaller, reusable pieces — making your project easier to build and maintain. Astro fully supports this pattern, and you can pass data between components using props, just like in other frontend frameworks.
---
// src/components/Greeting.astro
const { name } = Astro.props;
---
<p>Hello, {name}! 👋</p>
---
import Greeting from "../components/Greeting.astro";
---
<main>
<h1>Welcome to My Site</h1>
<Greeting name="Madiba" />
</main>Conclusion
Working with Astro to build diba .projects was a great experience. My main goal was to create a fast and lightweight website, and Astro turned out to be a solid choice for this. It also gave me a chance to improve my JavaScript skills, as I focused on avoiding external hooks and dependencies.
I plan to write more articles diving deeper into different aspects of Astro as well as other topics, and I’ll also share a detailed look into the documentation process for building diba .projects soon, so stay tuned!